


Photographing Large Industrial Castings on Location
Photographing Large Industrial Castings on Location
Big, shiny, products require big sources to effectively light


Hi, I am Charlie Borland and welcome to my All About Photography newsletter. I have been a pro photographer for over 40 years and have a lot to share with you. Please join the photo adventure by subscribing to this reader-supported newsletter.
Photographing Large Industrial Castings on Location
Products photographed on location are generally products that cannot be brought to the studio or the client wants them photographed in use at a client’s location. In other cases, the product may be manufactured far away making it cheaper for you to go there.
These types of products can vary widely in shape and size and being prepared for any contingency is important. I usually, but not always, know what the product is and its size before arriving to photograph it and that allows me to make sure I have all the right tools to pull off the job.
Traveling
When I travel on the road to a location out-of-state, I cannot fly with many of the things that I have at my disposal in the studio. If the assignment includes air travel, hopefully, there is time before the shoot to find an equipment rental location for the things you could not bring.
Traveling to location means paring down what I take which often includes two cases of mono lights total of 10, 15 ea. light stands of different sizes, large and small light panels, a tripod, a backpack with cameras and lenses, and a Grip case with lotsa power cords, duct tape, tools, floor stands, gels, and a lot more.
If you are enjoying this post, please share it.
The Setup
For the background, I use a seamless paper background and for this photo it is blue: the client’s corporate color. Flying with a 9’ seamless background is ridiculously expensive so I call my camera store down the street and have them ship it to my client contact a week before we depart. After the shoot, I find a parent who works there and give them the background so their kid can take it to school for art projects.
Knowing I will be photographing shiny parts, I take two 72’ x 72’ light panels and two 36’ x 72’, all to create diffused highlights on the parts. If I was shooting locally and not flying, I would throw in varying sizes of foam core to add to my reflective tools. You just point your light at the foam core and it becomes a bigger light source for creating highlights.

This is an example of a large product that is too big to bring to the studio, so I have to take the studio to them. It is an industrial casting hanging by a heavy lift crane and is over 6’ tall. If you look as closely as you can, on the left side is a thin black line, and on the right side, is an even thinner line appearing behind his ‘rear.’ That is the edge of the 9’ wide seamless indicating how large the casting is.
Subscribe and get these posts direct to your inbox.
The Lighting
Due to its size and shiny surface, it needs to be lit with reflections to create diffused highlights.

This is a diffused highlight. They are created with large diffused sources, like a lightbox instead of a raw strobe light.
When I look at this product and see the shiny metal, I know that that metal casting needs an even highlight across the entire part. If instead, I used a small umbrella or small light box, this diffused highlight might be much smaller, like the center circle of the casting.
Remember: Shiny objects reflect what they see.
This means you need a really big reflection across that huge casting. It also means you need a really large light source to create that even reflective highlight across the entire casting.
To achieve this, I used a large diffusion shoot-through panel just out of frame on the right to create an even highlight from side to side, top to bottom.

This diagram is a rudimentary depiction of the setup. You can see on the right that a large light panel is positioned so that when a light is shined through it, it’s like a giant light box that creates an even highlight across the face of the product. This panel also lights the technician standing there
With just a small umbrella or similar, you would only have part of the front of the product showing highlights and it will look bad. Remember:
Need large highlights? You need a large light source.
When we set up and positioned the casting, we turned it at a slight 3/4 angle to see the side of the casting and its details. Then we needed to add a highlight on the left side to prevent that area from going dark and losing detail.

This light was an extra large lightbox with a mono light. The lightbox added another diffused highlight to the center side of the casting to see that detail.
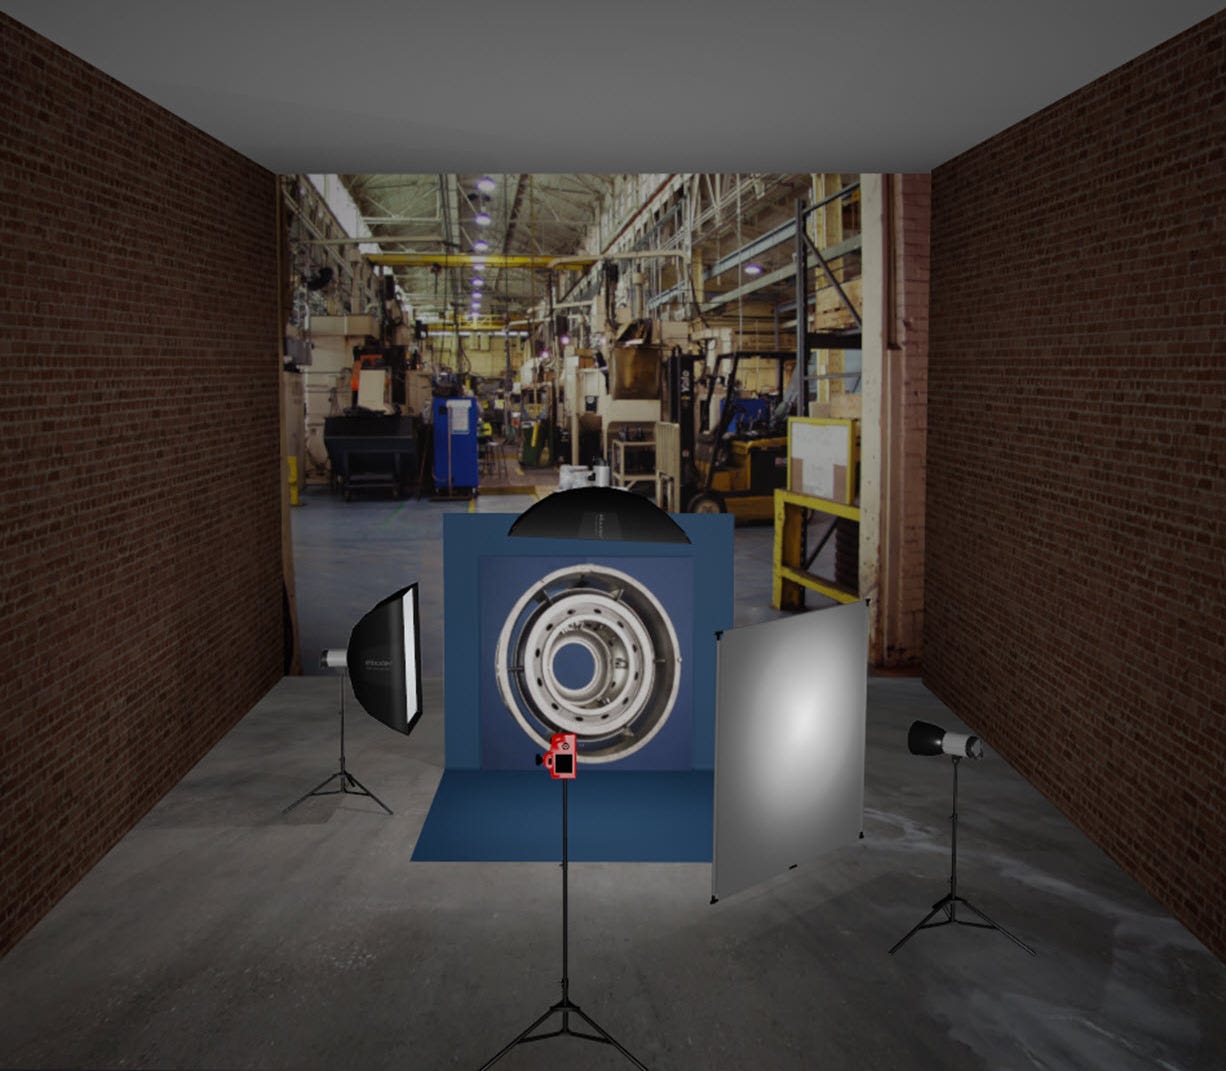
Looking at the lighting diagram again, you can see the overhead light on a lighting boom and this adds some detail to the top of the casting but also adds an edge light effect to the technician standing there. Since he is part of the final photo, properly lighting on him is important.
Subscribe and get these posts direct to your inbox.
I used ISO 100 at f/11 @ 1/125th to block ambient light from contributing to the lighting so that the only light that showed was that on the casting.

After delivering the images to the client, they expanded and cleaned up the blue background to give a little space behind the product and technician.
The takeaway from this is not only about the challenges facing photographers photographing large products that cannot be moved or shipped but also the point I made that large products often require large light sources to create those even highlights.
Have you photographed similar large products? If so, please share in the comments and tell us how you did it.
If you are enjoying this post, please share it.
Thanks for reading. New Photography School is a huge commitment to produce so please join as a subscriber or patron, or take one of my streaming photography courses listed below. Your support would be greatly appreciated!
Support this Channel: Take a Photography Class
Online courses on Architecture and Real Estate Photography, Landscape & Nature, Professional Commercial Photography, Professional Nature Photography, Wireless Flash, and more.
Click HERE


Mark-
This probably took about an hour and a half. Maybe 2. But when I do these assignments, we start with looking at the item to be photographed and gauge what we are up against, then if the part can be moved like this one, we move it to a spot where we have enough room to setup the background and place lights around it. The approach os that this part is to the end client what photographing a diamond for a jeweler as far as making the part look great.
Was this a 2 hr set up and test shooting bridge the technician came? Looks like a time-expensive shoot.