


Photographing Large Groups Outdoors
Photographing Large Groups Outdoors
While an large outdoor portrait may see simple, there are challenges to consider.

Hi, I am Charlie Borland and welcome to my All About Photography newsletter. I have been a pro photographer for over 40 years and have a lot to share with you. Please join the photo adventure by subscribing to this reader-supported newsletter.
Photographing Large Groups Outdoors
Have you ever been asked by those who know you are a photographer, if you would photograph their portrait? Or their family portrait, portraits at work, or group portraits for a business. If so, then you might understand that there is more than clicking the shutter to capture a good portrait.
If you browse social media photography groups you will no doubt see many portraits captured with natural light and while outdoor light can be great, it needs to be just right for great portraits. Whether you plan or want to light your portraits, you should understand how to just in case.
So here are a few strategies that you can employ if you need to. In this senior portrait example, the light is horrible on her so you would be better off to move her into shade and that will help, but it may not make it perfect.

1/250th @ f/2.8
Instead, I added flash fill to brighten her up by filling in the front of her.

Besides brightening her front side, what else do you notice? By adding the flash I was able to change my exposure -1.3 stops to 1/250th @ f/5 and this darkened the ambient light which also darkened her hair lit by the sun. Considering the way the flash works, her front is side-lit by the flash and is close to the same brightness as her hair.
What’s this got to do with groups? It is the same strategy used with photographing groups but I don't have any before and after images for these next points.
If you are enjoying this post, please share it.
Location and Lighting
Choose a location with even lighting to avoid harsh shadows on people's faces. Overcast days can provide soft, diffused light, which is ideal for portraits.
If shooting in direct sunlight, try to position the group so the sun is behind them, or use a diffuser to soften the light.
Composition
Position the group in a way that everyone is visible and no one is blocked by others. Arrange people in staggered rows if the group is large.
Consider the background. A simple, uncluttered background will keep the focus on the group.

This image is a combination of the last several points. A non-compete background with the trees in soft, overcast lighting. And nobody is blocked by another person.
What is the Best Time of Day?
It is widely known that early morning or late afternoon light, when the sun is lower in the sky, creates softer, more flattering light. This is great if you can make it happen but rarely do we have that luxury of choosing the perfect time for us to do our job.
Easily, the majority of times I have shot these types of photos is when the client tells me "I will have everybody here at 10:00 am." Then I arrive and do the shoot and these people head off to work wherever that is.
This next photo was shot when the client told me to be there. Then on top of that, it was a very sunny day, and look at the lighting contrast. The only thing you can do is search for shade or go indoors somewhere. But that was not going to happen with a horse and bales of hay.
Subscribe and get these tutorials delivered to your Inbox.

To pull this off I set up a battery-powered strobe light, more powerful than my flash, and set it next to the camera to fill in the shadows on their faces. I set the flash output to around -2/3 so you would still see shadows from the sun but they would be weak due to being filled in by the flash.

The other bummer about being in the sun is their eyes squinting from the sun. With this setup, that is difficult to avoid. But I have a solution coming up.

One of the other challenges when photographing groups is capturing everybody looking at the camera at the same time, so you take a lot of pictures. There could be somebody looking down or to the side, someone with a glum look on their face, or not smiling when everybody else is.
I cover this problem by taking a lot of pictures and the way I prep them to be ready for each click of the shutter is I say:
"Okay, here we go. Everybody, look right here. Okay, big smiles, right here everybody, big smiles, here we go."
Click! And click again. If I feel that I am not getting everybody in sync with smiles and facing the camera, I just keep going by taking more pictures.
Another thing I do that gets people in a lighter mood or gets their attention is I say:
"Well the French photographers tell everybody to ‘Lick their lips and make love to the camera’ and that makes them all laugh and it's a great time to click the camera and get all smiles. But you only want to use that line with the right group.
Put the Sun Behind the Group
I have mentioned shade and how it works so well when you are challenged with bright sun as just demonstrated. Putting the group in the shade is perfect if the shade is perfect. But you don't want dappled light where some people are in full shade and others have sunspots on them that filter through the trees.
In some cases, you may need to stay in the sun and this is when turning the group away from the sun is the best option because it places the front of everybody in the shade. This next series demonstrates this point.
This is a group in the shade from an overcast day and it looks perfect, except that due to it being a test photo where I was testing my strobe exposure you see a few unwanted shadows. But, it gives an idea of what overcast or shade can look like.

I could continue testing but then the sun started to come out and the rest of this shoot was constantly changing exposure to deal with the sun peeking in and out.

I continued testing and here you can see that the sun went behind a cloud before I readjusted the exposure. All this makes these shoots stressful so this is where your experience helps you make quick adjustments to stay on track with exposure.
Strobes, Reflectors, and Lighting
Reflectors are a great tool but there are a few reasons not to use them on shoots like this. A disc reflector or a large light panel, is generally not big enough to reflect light across this large of a group. You also cannot increase or decrease the amount of light reflected from a reflector to make its effect brighter or darker.

Since faces and bodies can have shadows develop even during overcast sky conditions, making eye sockets turn dark, those areas need to be brightened. So I use strobes or flash on any shoot like this, even overcast and outdoors.
Another advantage of using a strobe is it allows the use of a faster shutter speed to make the background darker and the subject brighter allowing it to stand out more.

Then, as I set up and tested, it soon looked like the sun was not going to go away so I needed to start dealing with shadow issues. Even though it was overcast when I started, I preferred that the strobe create nice portrait-style side lighting. To do that, I added the strobe light and set it up where I thought it needed to be. My early tests showed the shadows on two people created by two other people and the arrows indicate those with shadows on them.
If you are enjoying this post, please share it.
There are two ways to deal with this and the first is to move the strobe closer to the camera. This ideally, would send the shadows between two people rather than on one of them.

The other approach would be to ask people to move and that could be the two gentlemen with shadows on them (red arrows) to move back half a step. Or ask the two people casting those shadows (blue) to move forward half a step. A combination of all four people moving slightly and adjusting their position may remove the shadows and not hit anybody.

Here is the final picture.

Exposure
The biggest thing to remember about exposure is the challenge of backlighting, which often blows out the hair on some people’s heads. This is where using strobes provides you with the luxury of setting a shutter speed for the backlit hair to keep it from blowing out. Then if the highlight indicator is turned on in your camera, you can look at the histogram on your LCD and notice if any hair has the red 'blinkies' flashing. If so, set your shutter speed to -1/3 faster and test again. Repeat till there are no blinkies.
With the exposure set for the hair, turn on the strobe and adjust until the peoples front side is also a perfect exposure.
Posing
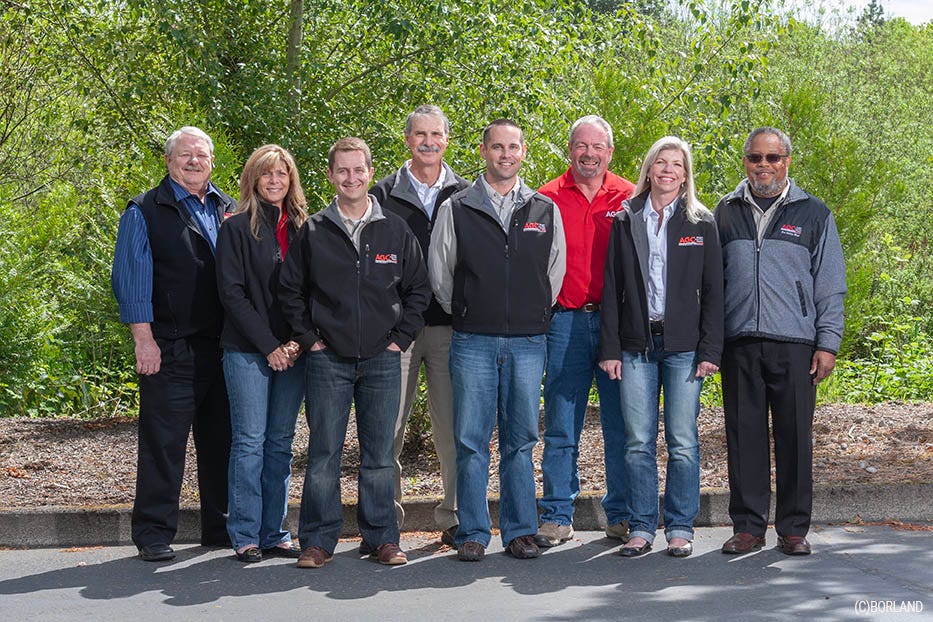
When photographing groups this size, I usually have the people in the center and pretty straight to the camera. Then, as seen in the final image, the two people on each end are turned inwards slightly but never outwards.

My Brooks Institute class.
If you have a group much larger than this you can pose people in multiple levels like this. On another group shoot, Nike asked me to shoot hundreds of people from the roof of one of their buildings. Yikes!
I hope this gives you an idea of photographing large groups with some insight on how to handle things if they don't go your way.
Subscribe and get these tutorials delivered to your Inbox.
If you enjoyed this or have comments, please leave a comment.
Thanks for reading. New Photography School is a huge commitment to produce so please join as a subscriber or patron, or take one of my streaming photography courses listed below. Your support would be greatly appreciated!
Support this Channel: Take a Photography Class

Online courses on Architecture and Real Estate Photography, Landscape & Nature, Professional Commercial Photography, Professional Nature Photography, Wireless Flash, and more.
Click HERE
Get the eBook

https://greatphotographycourses.net/ebooks/


such a challenging situation! I always struggle with it
Beautiful pictures