


On Assignment: Photographing The Cat Burglar
On Assignment: Photographing The Cat Burglar
An assignment for a TV station using our existing studio set was perfect for the fake burglar photo.


Hi, I am Charlie Borland and welcome to my All About Photography newsletter. I have been a pro photographer for over 40 years and have a lot to share with you. Please join the photo adventure by subscribing to this reader-supported newsletter.
On Assignment: Photographing The Cat Burglar for a TV Station
I once had a client that was a TV station and they gave me awesome assignments. Most of those assignments were for stories they would be running during prime-time news.
These stories were concept-related such as the state of veterinary medicine, problem gambling, local recreation opportunities, bad commercial landlords, and in this assignment: the growing problem of residential burglaries.
When I met with the photo editor we discussed ideas and I mentioned at one point that we had a studio set that could be used as a dining room, bedroom, living room, and in the case of their need, a fake window in a home that a burlar is peeking in.
He was all for it!
The Set
The studio set used here was primarily for stock photo shoots of all sorts of subjects like business meetings, a birthday party, a bedroom, a background, and in this shoot, we used one of the windows for the burglar. We just brought in or rented the furniture and props based on what we needed to photograph.

Here is a series of images using the set in the studio with a wall that appears to be in a house. That wall with the windows is about 4 feet from the studio’s exterior wall and the design of this construction allows us to put lights back there and shine them through the window or bounce them off the exterior wall and back through the windows for a softer effect.
Then we needed a model that looked like a cat burglar. That was a challenge since asking someone to model because they looked like they could be the perfect criminal could result in lots of people declining. Their face would be in the largest area newspaper and on TV for a week and it is not unusual for average people to be uncomfortable.
If you are enjoying this post, please share it.
We could have called the modeling agency but a bad boy model was at least $500 an hour with a three-hour minimum. All this info was shared with the photo editor who requested we look for someone much cheaper.
When I returned to the studio from the client meeting, I asked my studio manager to think of places to call and begin searching for a model. To my surprise, she said: “Oh I got a friend who would be perfect” and sure enough he was.
Lighting for Effect
When it came to lighting, I planned to light for effect as I did in this previous post. That means I would create lighting that mimicked nighttime in this case. While burglars invade any time of the day, stereotypically, we are used to that occurring during the darkness of night.
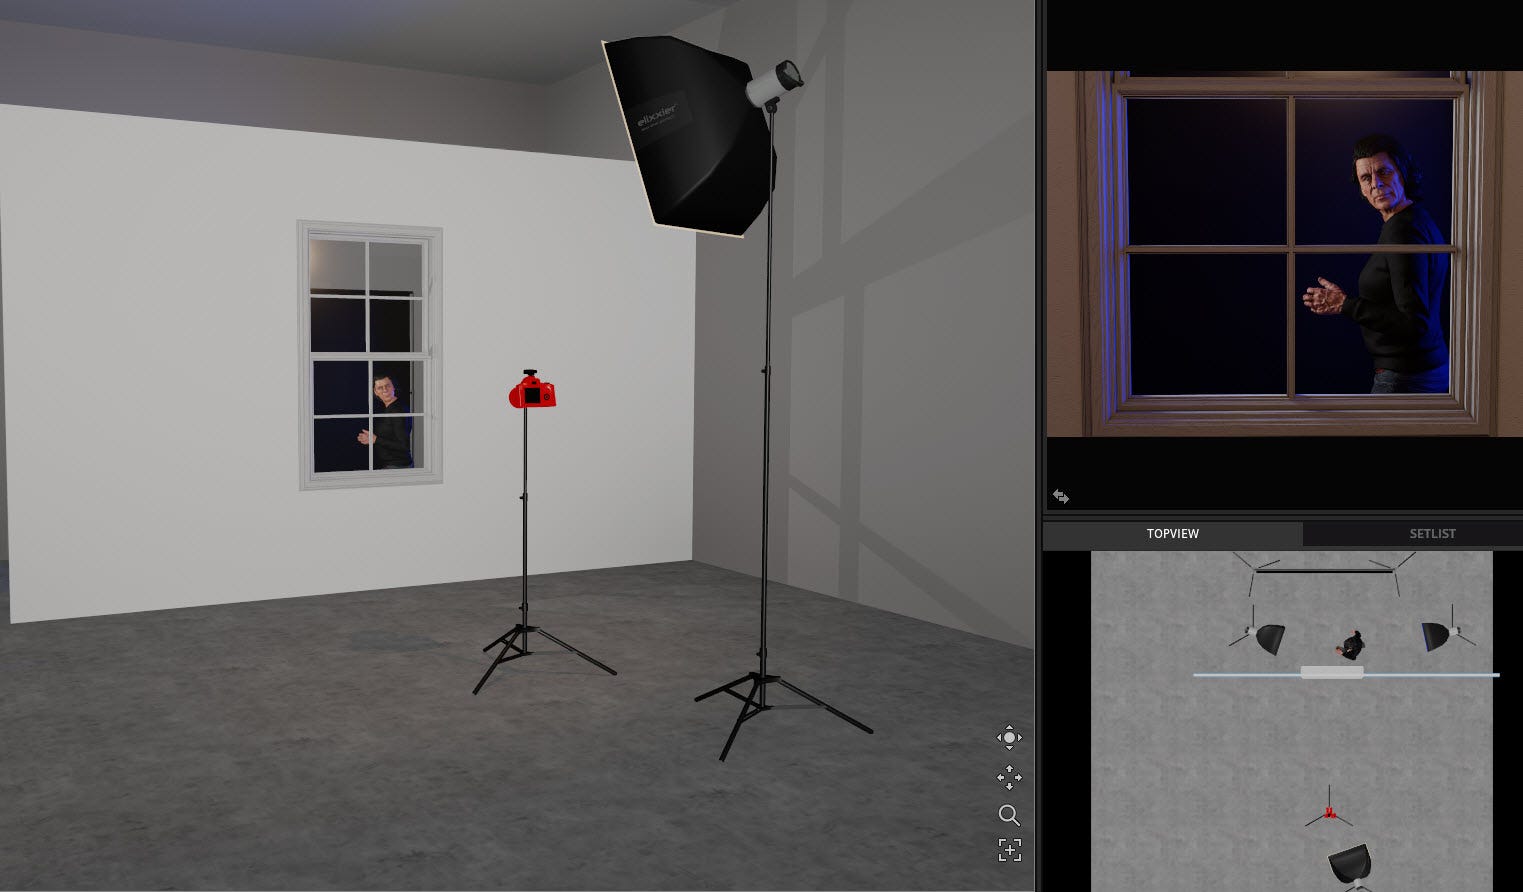
The view from above of the lighting setup starts with a black seamless paper background (1) and its purpose was to ensure that it was dark through the window. With 3 strobes back there, there is no doubt that that rear wall would be illuminated by those strobes and not be dark or look like night. The black seamless solves that issue.

At the top of the diagram, #2 is a large lightbox with a dark blue gel which creates the feel of night on him and also the window curtains sheers. Item 2a, there is another strobe with a strip light box that has no gel and is designed to light him from behind.
Lightbox #3 is a medium-light box, also with a blue gel, and its main purpose is to light the burglar and the sheer curtains with blue light on that side. Light #4 is a medium lightbox aimed at the burglar to light his face.
Subscribe and get these tutorials delivered to your Inbox.
Looking through the Window
On the front side, we had the camera which was around a 50mm lens. For lighting, we had a large lightbox with a 1/2 CTO-colored gel on that light, which is amber in color. Why?
If you think about these two colors, they are close to opposite on the color spectrum. But more importantly, blue is a color that is known to create a sense of cold or night. Amber is a color that gives a sense of warmth and comfy.

When you see an image of a lovely log cabin surrounded by snow and all lights are turned on inside, there will be a blue color cast outside and a warm cooler cast inside. This is the same approach I was taking.
On the front side of the wall, would be the inside of the house with the curtains hanging. (3D software has no cuirtaiuns) and I used a large lightbox with a 1/2 CTO amber gel attached.

From the camera side of the wall, you have the blue light hitting the curtains for the nighttime effect and you can see the slight amber color from the large lightbox next to the camera. Cool outside, warm inside!
If you are enjoying this post, please share it.
With all lighting set and in position, the next step is to test and test and test again, until all lights are outputting the amount of light that creates the effect you desire. This means adjusting the positions of all lights, increasing or decreasing each light power level, until you have the balance in tonal values.
Now, there is one more super important point to mention here and can you guess what it is?
The Reflection
The knife needs a reflection on it so how do you get that on there? First, shiny metal or glass, even plastics, are shiny and need to ‘see’ something bright or white to create that reflection.
Once all lighting was set and tested for good exposures, I had the model move the knife around to get a reflection on it like seen here. This required some adjustment of the large light box next to the camera and as I shot test photos, I had my assistant raise and lower the light including left and right until we had the perfect reflection.
That’s a Wrap! I hope you learned something new from this tutorial and as always, I would love to hear from you if you have any thoughts or questions.
Subscribe and get these tutorials delivered to your Inbox.
Keep Shooting!
Thanks for reading. New Photography School is a huge commitment to produce so please join as a subscriber or patron, or take one of my streaming photography courses listed below. Your support would be greatly appreciated!
Support this Channel: Take an In-Depth Photography Class

Online courses on Architecture and Real Estate Photography, Landscape & Nature, Professional Commercial Photography, Professional Nature Photography, Wireless Flash, and more. They start as cheap as $9.99.
Click HERE
More Awesome Tutorials


You were perfect for this and his reply was I dont think I am proud of that.
Nice to learn about the process. Even things like the challenge of finding a model who wants to be a criminal are really enlightening.
I never had the opportunity to shoot in studio, I always do it outdoor. Thank you for sharing this, it was interesting to read about to processes to take a shot in studio.