


On-Assignment in the Dead of Winter
On-Assignment in the Dead of Winter
It was February. 18 degrees. And Silcox Hut is at 7000' ft on Oregon's Mt. Hood.


Hi, I am Charlie Borland and welcome to my All About Photography newsletter. I have been a pro photographer for over 40 years and have a lot to share with you. Please join the photo adventure by subscribing to this reader-supported newsletter.
On Assignment in the Dead of Winter on Oregon’s Mt. Hood
One bitterly cold February, I was asked to go to Silcox Hut at 7000' on Oregon's Mt. Hood, for a photoshoot. My client had several Oregon Tourism accounts including the Mt. Hood Territory which provided marketing and membership services for businesses that served tourism within that area.

It was a fun account to work over the years as I photographed everything from snowshoeing trips, snowmobiling, lodges and hotels, the mountain bar for skiers, fireworks over ski slopes, sleigh rides, fly fishing, and a lot more.
The Assignment
I was assigned to photograph at Silcox Hut, which sits well above the tree line and in a windswept alpine setting. Built in 1939, Silcox Hut was used as a warming hut for skiers and mountain climbers up high on Mt. Hood.

The night of the shoot, a company was throwing a private dinner for a list of their clients. It was the dead of winter in February and my job was to photograph interiors, the dinner, the chef, and exteriors of the Hut, with those images later being used in marketing.
It is a very cool location and is available to rent for everything from weddings, to private parties, and an overnight getaway, or in this case: a client wining and dining their clients.
If you are enjoying this post, please share it.
Planning
Prior to coming to the mountain, I spent time planning the shot list and gear I would need and besides cameras and lenses, I included a tripod, three light stands, my kit of wireless flashes, a color meter, lighting gels, and my grip kit containing everything from batteries to pliers and tape.

Along with equipment preplanning, I also carefully considered the apparel for photographing outside in the 18 degree weather. I had all the winter clothing I needed which included winter pants, a parka, fleece underneath, a stocking hat, fingerless gloves, winter boots and a neoprene facemask.

The trip to Silcox Hut was aboard Timberline Lodges snowcat and I was able to go up with the art director in the early afternoon to photograph the interiors and the exteriors during daylight.
Subscribe and get these tutorials delivered to your Inbox.
The ride was fun as we were in a few brief whiteouts and then the skies opened a little upon our arrival. Then once the evening ended, I would ride the cat back to the lodge with all the guests, which is one reason I could not bring a more lighting gear to photograph the hut due to the room inside the snowcat.

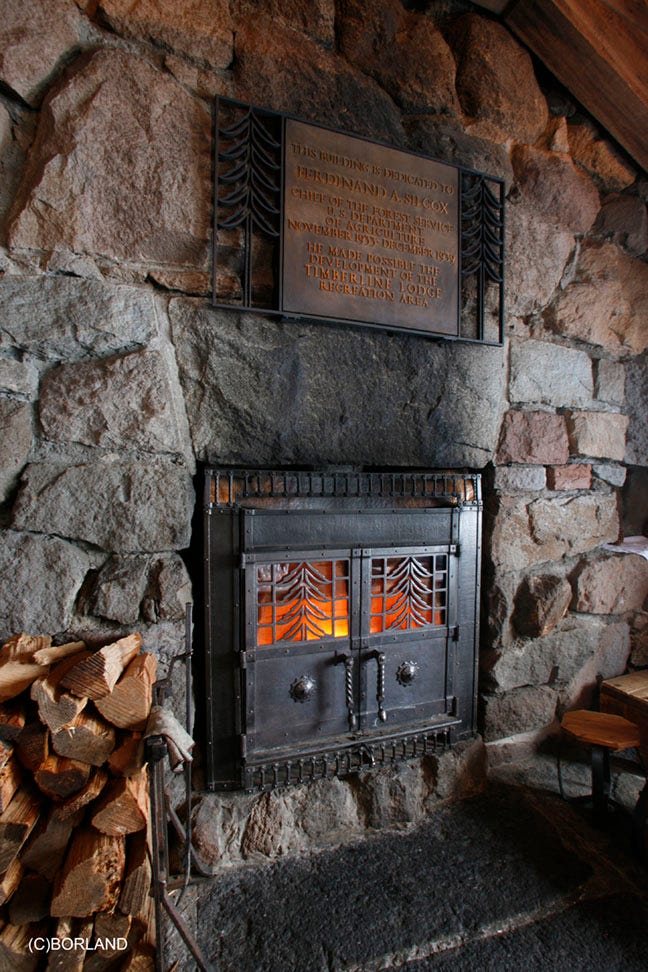
In this portrait of the chef, I placed a flash and umbrella to his left, where the window light comes in and to illuminate him. A second flash was on the right from the camera and closer to it, to add light skimming across the foreground of the table and make the lighting more even from the chef to the camera. I next captured a lot of additional imagery of the place settings, the chef, the bar, and more.
Exteriors at Dusk
When dinner wrapped up, I suited up and grabbed my camera and tripod and headed outdoors. It was already getting dark and I had to work fast. For the exterior of the hut, I planned to shoot just a couple angles. It was quite cold and the clouds had rolled in and it was snowing lightly.

I quickly set up my camera with a 16-35mm lens and bracketed wildly to capture some of the detail in the surrounding areas. When the light is rapidly diminishing, I always bracket my exposures in a 5 stop sequence to make sure I have images with all needed detail.
If you look at the middle row, left side, they are very bright while the bottom row looks more dark and wintry. But what I wanted more of was the window brightness on the left side of the hut, but it was weak due to sparse interior lighting.
I could of used flash inside to brighten up each room but timing did not allow me to race in and out moving my flashes from room to room because it was getting dark and fast, so I created the look in Photoshop.
Processing
The main things I needed to do was brighten all windows more evenly and create separation of the roof of the hut from merging with the sky. I started with processing the outside to create a more winterly look. This is the base image before processing.

I next added a Curves Adjustment Layer to darken the image some.

By pulling down on the curve, I added a bit more density to create a darker image for a better night time look. But if you look at the roofline of the hut, the snow is the same density as the sky so I needed to create more separation. The obvious choice was to make the sky a bit darker.

I started with Select> Sky to see what Photoshop would determine was the sky but it did not work because everything was pretty much the same tonal value. So I chose the Elliptical Marquee tool and made straight line selections along the roofs edge and all the way across before make half curves on each side of the hut. There was no horizon line so I needed a rough selection on each side of the hit that I could blend later.

With that selection, I added another Curves Adjustment Layer and pulled it down to darken the sky more and there is now a distinct line with a hard edge that need to be blended.

To blend those hard edges created by the mask, simply paint grey at an opacity of 25% to add grey between the black and white in the mask and this more seamlessly blend foreground and sky.
Subscribe and get these tutorials delivered to your Inbox.
The Windows
It was obvious that the interior light inside the hut was not good enough to create those perfect windows with warm light emanating from inside.

The left windows are the issue so to brighten them up, we will add light using Photoshop.
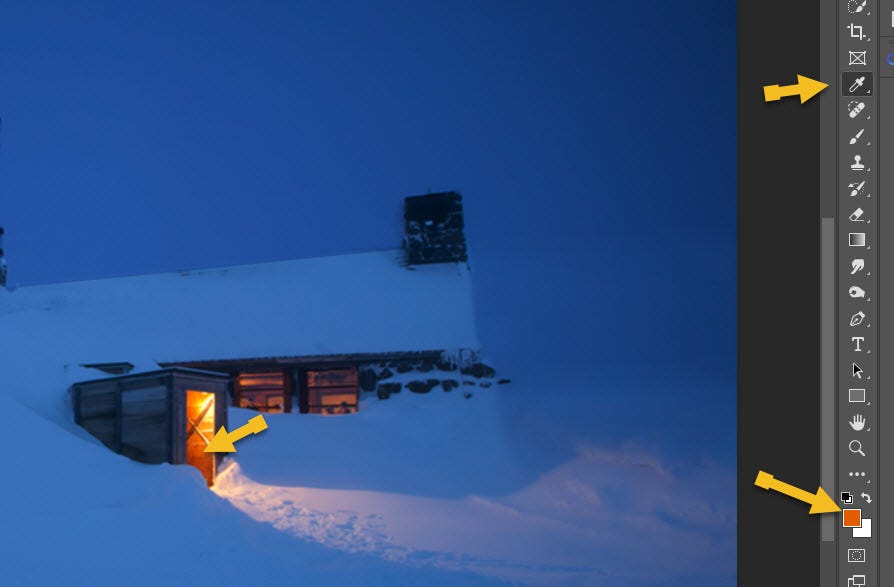
The first step was to use the color picker to select the amber color inside the doorway on the right and set this as foreground color.

Then using the Elliptical Marquee tool I selected each window.

With the amber color selected as the Foreground Color, I next added an empty layer, then clicked the mask which made a mask that looks like this: black with the windows areas clear.

Even after filling the windows with amber and setting the blending mode to Color, the window was still too dark.

So I added a Curves Adjustment Layer and raised it up to brighten the windows to look more like the brightness of the entrance door. This of course brightened the whole image quite a bit, so in the Layers Palette, I clicked the mask attached to the amber colored layer, and holding down Alt/Opt, drug that mask onto the Curves layer to replace the empty mask. Now the brightness is isolated only to the windows by the mask.

I selecting the windows on the left side based on brightness as some were brighter than the others. Like the first window, I used the marquee tool to select each group of windows and then filled an empty layer with the amber color and then attached a mask.
I then realized that each window group, all having the amber color, had a different brightness. So I added a Curves Adjustment layer above each amber layer and then adjusted the brightness of each curve to ensure all windows were equal in brightness. I then finished it off with a Hue/Saturation layer to bump color.
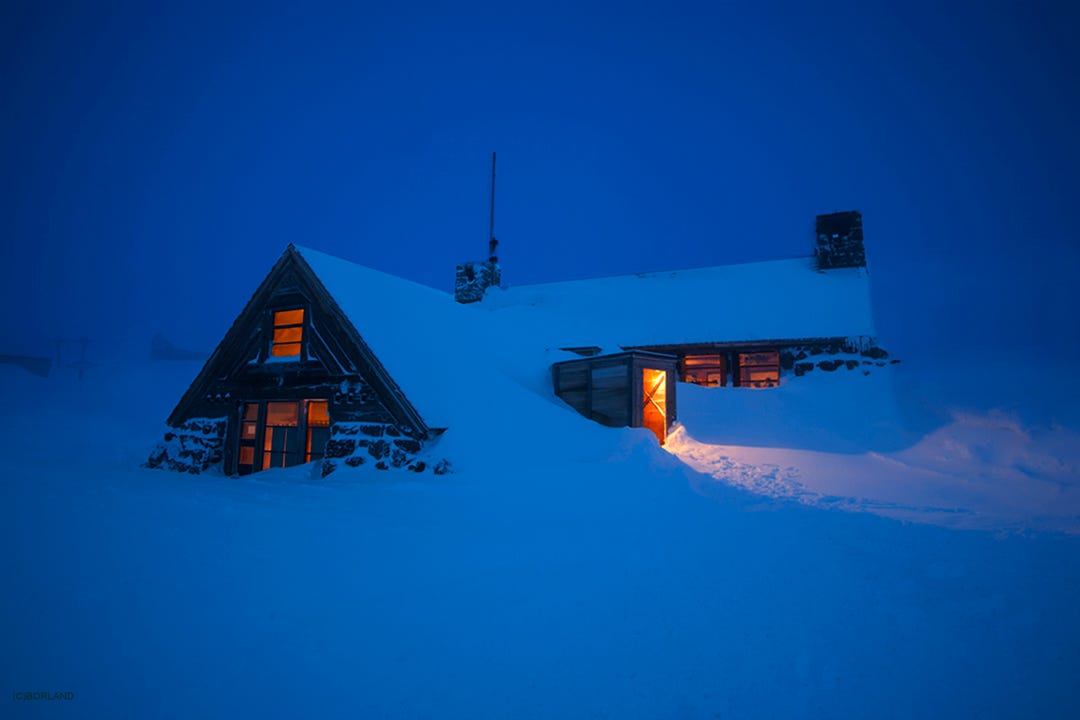
The final image!
I hope you enjoyed this tutorial and if you are not already, please become a subscriber or even a patron.\
Keep shooting!
If you are enjoying this post, please share it.
Support this Channel: Take a Photography Class

Online courses on Architecture and Real Estate Photography, Landscape & Nature, Professional Commercial Photography, Professional Nature Photography, Wireless Flash, and more. They start as cheap as $9.99.
Click HERE
More Awesome Tutorials


Great processing tutorial Charlie, thank you
For those that might not've ever been on Mt. Hood: being up near Silcox on a bluebird day is an incredible, life-changing experience.