


How I Photographed the Book Cover
How I Photographed the Book Cover
The book cover idea was the hardest part.


Hi, I am Charlie Borland and welcome to my All About Photography newsletter. I have been a pro photographer for over 40 years and have a lot to share with you. Please join the photo adventure by subscribing to this reader-supported newsletter.
Note: This complimentary tutorial is part of my online photography course: Wireless Flash for Outdoor and Adventure Photographers HERE.
How I Photographed The Book Cover
Photographers are known for the work they do and for those who wish to gain attention to their photography and business, being unique is a requirement.
When I was writing my book: Outdoor Flash Photography, I wanted to write a book illustrated with some great photography that included trying to include my unique vision for the cover. I had no idea how the cover would be illustrated but I was on the hunt every single day for scenes worthy of photographing for the book.
Planning the Trip and Shoots
When my wife and I hit the road to photograph around the west, I had a list of locations I wanted to photograph and I also had a list of images to capture for my book.

Once on the road, I went about photographing and filming how you can use flash in landscape and adventure photography such as using flash fill on desert cactus, lighting wildflowers on overcast days, illuminating camping tents, and later, I photographed adventure sports like running, mountain biking, and more.
It was the cover photo that I was most concerned about capturing on this road trip and after a couple weeks, I found the location. We had arrived in Joshua Tree and it was late fall. As we wandered around the campgrounds looking for a campsite, we discovered one and moved right in. The scene I photographed was two campsite away from our site and they were unoccupied.
As I sat in my camp chair sipping a beer, I kept staring at these glorious rocks wondering what they looked like at sunset and after. Then I asked my wife to walk over and climb up on this rock. THEN IT HIT ME: I FOUND MY PHOTO SCENE!
If you are enjoying this post, please share it.
The Photography Setup
So, I immediately got busy planning the photo setup. The sun was still high at mid-afternoon, so there was plenty of time to get ready. For light coming from the flash to really show up in a scene, the ambient light has to be darker than the flashes light. That meant waiting for sunset and shooting after the sun had set.

Then once it set, I bracketed my exposures without the flash being on, to capture dark images and bright images. I do this because Photoshop compositing is pretty easy and an option in case something does not go right and I want a brighter or darker background.

In these darker and brighter images, there was a nice pink/purple alpenglow that I fully planned to use in my final image.
Adding the Light
My photo idea was perfect for using one of my favorite techniques with flash: The hide-a-flash technique. This technique simply means that I place a wireless flash inside the scene somewhere and hide it behind something.
When you think of the way flash is most often used, it is placed in the cameras hot shoe where it sends light into the scene that you framed with your camera.
Hide-a-light, as I mentioned, is hiding the flash inside your scene where it is not seen in the photo, yet the light that comes from the flash illuminates something and is visible.

In this scenario, the flash is hidden on the other side of the rock that my wife is standing on, and placed on that campsites picnic table. It has a full CTO amber gel that provides the warm colored light and it is aimed at the large rock wall creating a glow that simulates a campfire. I also used a wireless flash trigger that had enough range to trigger the hidden flash directly from the camera.

The flash is then set to manual output to get consistency with every burst of light from the flash. Before it got dark, I tested the flash to find the perfect power level to set on the flash. To do this, set your shutter speed to the fastest sync speed your camera has. Then take a picture at your chosen aperture, and here mine was f/8 @ ISO200 and with the flash set to full output of 1/1. I then shot additional tests with flash output set to 1/2, 1/4, 1/8, 1/16, and 1/32. The next step is to review each of these and pick the combination that has the perfect flash exposure on the rocks. For my setup, it was f/8 @ 1/60, ISO 200.
After I got all the flash images on the rock I wanted, I turned off the flash and bracketed the shutter again to capture a variety of ambient light exposures in which the ambient is even darker than it was when I began. I continued shooting well after sunset and captured some alpenglow color behind the rocks, which I would use in processing.

Here is the RAW file of the scene and you can see how flat and dark it is. So I opened it in camera RAW.

A closer look shows my settings in Camera RAW where I wanted to brighten the image up.

These were the camera RAW settings and for this image, that was it because I prefer to make major adjustments like saturation and contrast with adjustment layers once inside Photoshop.

I next darkened the image a little to make the ‘campfire’ glow more.

Next, a Curves Adjustment layer was added for a slight amount of contrast was added.

In the previous screen capture, the rocks looked too red and in my mind’s eye, they should be more yellow than what showed. So, I added a color balance adjustment layer and added yellow. The next adjustment is to make the sky more blue because it looks grey here after adding yellow.

So I went to Select> Sky to select it and saved that selection as Sky.

Next, I added another curves adjustment layer, switched to the Blue channel (not shown), and pushed it up which added blue but it also added magenta making the sky purple. So, I selected the Red channel (seen here) and pulled down on that curve which added Cyan and removed the red from the sky making it bluer.
Subscribe and get these tutorials delivered to your Inbox.

Here is the blue sky now but it is flat blue. Skies, usually have gradation to them so I need to fix that.

But first, I will mention that when we were done shooting the flash image, the blue sky went away and alpenglow came out and I decided to recreate that in the sky as best I could.

I next took the Alpenglow image and dragged it on top of the main image and quickly realized that the images were not in alignment and actually, different sizes. Knowing that would take some time to force them into alignment, I decided to use a Gradient to make the alpenglow.
If you are enjoying this post, please share it.

To do this, I needed to select the true alpenglow color from that image so I chose the eyedropper tool and sampled it to create my new foreground color.

With the alpenglow color selected, I clicked on the Color Balance layer and then at the bottom clicked New Empty Layer which now shows above the Color Balance layer in the layer stack and is titled Layer 2. This is where I create the alpenglow so that it is behind the rocks.

I next click the Gradient Tool (orange) and the empty layer (green) becomes the Gradient Tool and displays the gradient options in the upper left corner (yellow) showing the Magenta-to-Transparent gradation. Then I choose Reflected Gradient (blue), placed my cursor at the point (Red) where I want the center of the gradient to start, and drug it down to create the alpenglow. You can now see it sits in front of the rocks.

Seeing that the alpenglow gradient was too bright, I lowered its opacity to 65%. Now it is time to put the gradient behind the rocks.

To do this, I go up to the Curves 2 layer (yellow) and click on the mask. Then holding the Alt/Opt key, I drag that mask to the Gradient layer (green) and fill in the empty mask. This forces the alpenglow behind the rocks.

Now the gradation is behind the rocks but has an abrupt edge (red) that needs smoothing.

The first step to smoothing the gradient was to select that layer (blue) go up to the top menu and click Layer>Group Layers (not shown) and the gradient layer is now inside that group. (right above blue). I reset the foreground color to black (green) and the gradient is now black-to-transparent (yellow) followed by selecting Linear Gradient (Red).

I then clicked at the top of the image and dragged the black Gradient halfway down (yellow).

Now the Gradient is smoothed. The original image was not very blue in the sky so that is the next step.

I added a Curves Adjustment Layer (yellow) and added contrast and more blue to the sky. The next image shows this in detail.
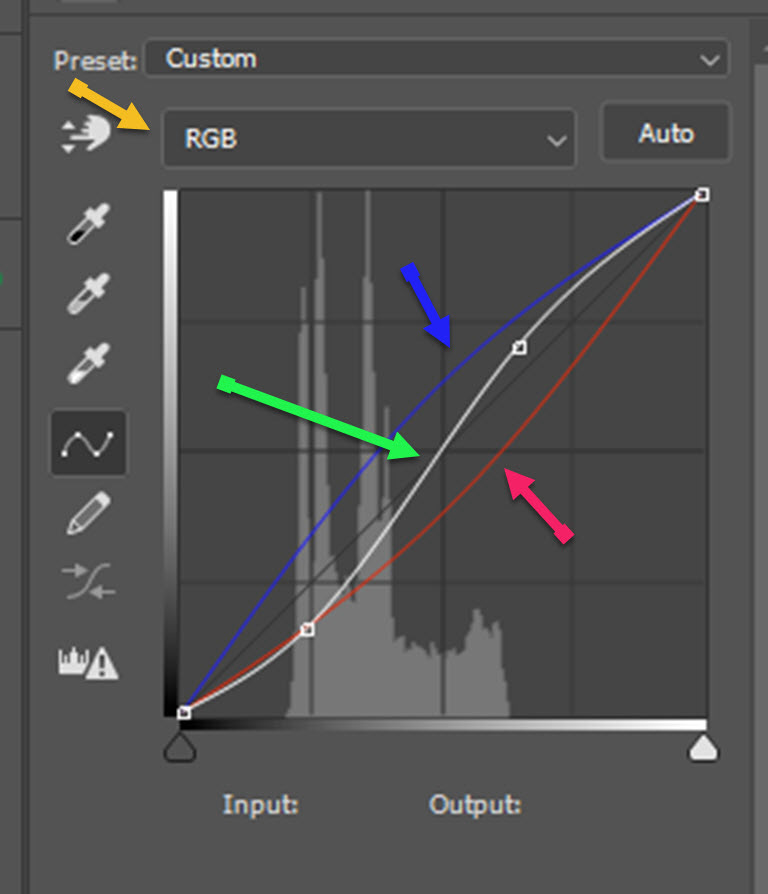
First, I added an S curve (green) to the layer, then clicked the drop-down menu for channels (yellow) and drug the blue channel (blue) up, and then selected the red channel (red) and pulled that down which added cyan and removed the Magenta tone from the blue sky. Now we have a blue sky with alpenglow. The final step is to add a moon.
If you are enjoying this post, please share it.

So I went into my ‘Photo Elements’ folder, which are things I can add to images like moons, sunsets, etc., and selected this moon.

Using the quick selection tool, I selected the moon. Then click Ctrl/Cmd> C.

Back to the main image, I clicked Ctrl/Cmd> V and pasted the moon which added its own layer. Selecting the move tool(V) allows you to move the moon into the position you want.

To put the moon behind the rocks, I dragged the same mask onto the Moon layer and now it is tucked away.

That’s it, my friends! The cover of my book Outdoor Flash Photography.
I hope you enjoyed this and if you have questions or thoughts, please leave a comment.
Subscribe and get these tutorials delivered to your Inbox.
Support this Channel: Take a Photography Class

Online courses on Architecture and Real Estate Photography, Landscape & Nature, Professional Commercial Photography, Professional Nature Photography, Wireless Flash, and more. They start as cheap as $9.99.
Click HERE


